 Hunting Trophy Room Pictures
 Go | New | Find | Notify | Tools | Reply |
| New Trophy Room Project / Progress Photos Updated for 11/16/19 | Login/Join |
One of Us |
Funny thing is the brick and stone masonry crews I just fired last week will be begging to get the job on the house I'm starting in a couple of weeks. I'll be reminding them of no showing my personal project when they do. | |||
|
| One of Us |
Some updates. Brick and stone work mostly completed. Interior framing now completed. You can now get an idea of the height of the interior walls and size of the open area.     | |||
|
| One of Us |
Looks good! Proof if you raise enough hell, you can get people to do their jobs! Sometimes, anyways! The interior shots are helping me visualize what I want to do. | |||
|
| One of Us |
Proper Redneck! Guns and hunting | |||
|
| One of Us |
Damn right Son!! | |||
|
| One of Us |
Looking great! What are your plans to finish the interior trusses? | |||
|
| One of Us |
Those trusses are going to be left open and painted black. The interior roof will be spray foam insulated and painted black. The HVAC will be rigid ducting and also painted black. The interior will have a rustic finish. Plan is rusted tin wainscote with reclaimed lumber walls above. One wall will be finished in stone to match the porch columns. Floor will be stained concrete in a rust/copper color. Two sinks, one in the bar, the other in the bathroom are made from petrified wood. Track lights and fans will be suspended from the trusses. | |||
|
| One of Us |
Sweet, looking forward to seeing the finished product!
| |||
|
| One of Us |
Thanks a lot for sharing your room, Todd. I'm planning something similar and the visual is very helpful. As is your planning on the details. Keep it coming!! | |||
|
| One of Us |
Thanks. It's a process for sure. May not have a lot to show over the next couple of weeks. Electrical wiring and insulation scheduled for this week so it may be a couple of weeks now before there is anything of interest to photo. Hoping to start getting some interior finish work started next week but anyone who's been involved in a construction project knows how that works! lol | |||
|
| One of Us |
Last year I remodeled our kitchen, with my wife painting the cabinets. This year I am replacing every square inch of flooring in the house. With a full time career and a 1 year old, if i had to build what you are doing it'd take me a damn decade! | |||
|
| One of Us |
Coop: That's close! I built a 20'x 50' shop with 13'6" all brick walls mostly alone. ook me 13 years and it's still just a dirt floor. Looking good Todd, off to a good start. George "Gun Control is NOT about Guns' "It's about Control!!" Join the NRA today!" LM: NRA, DAV, George L. Dwight | |||
|
| One of Us |
Or a Ford Focus. ______________________ DRSS ______________________ Hunt Reports 2015 His & Her Leopards with Derek Littleton of Luwire Safaris - http://forums.accuratereloadin...6321043/m/2971090112 2015 Trophy Bull Elephant with CMS http://forums.accuratereloadin...6321043/m/1651069012 DIY Brooks Range Sheep Hunt 2013 - http://forums.accuratereloadin...901038191#9901038191 Zambia June/July 2012 with Andrew Baldry - Royal Kafue http://forums.accuratereloadin...6321043/m/7971064771 Zambia Sept 2010- Muchinga Safaris http://forums.accuratereloadin...6321043/m/4211096141 Namibia Sept 2010 - ARUB Safaris http://forums.accuratereloadin...6321043/m/6781076141 | |||
|
| One of Us |
Wall insulation completed and OSB sheeting starting. Ceiling insulation was supposed to be blown in today as well but the electrician didn't get the overhead wires pulled yet.     Third try on getting the stone columns correct. Still working on them.  | |||
|
| One of Us |
Looking better! What was the problem with the stonework? Language barrier? | |||
|
| One of Us |
Lack of ability! lol. The guys were trying to match the top brick finish on the columns to match the brick ledge. Two were basically flat and one looked like Mt. Everest. The other was wobbly. Had to tear off the top brick and re-do them. First two attempts the contractor just used his common laborers. Final try he got his specialist. | |||
|
| One of Us |
I really like it! I am hoping to do something similar in the future. Keep the picks coming! | |||
|
| One of Us |
It’s really coming along well. I meant to be DSC Member...bad typing skills. Marcus Cady DRSS | |||
|
| One of Us |
Updated photos. Finally got the porch columns correct. Metal just needs painting now to match the building. The exact correct height to lean on or rest a drink!!  Six days ago, these were brand new shiny shiny shiny sheets of tin. 4 gallons of muriatic acid and a few days of sprinkler action has aged them about 20 years or more. Cut into 4 pieces each and attached with channels oriented vertically, these will comprise the 3 foot wanes coat.  Above the tin wanes coat, these recycled boards, arranged horizontally, will comprise the walls.  The under walls are now completely insulated and covered in OSB. The wall behind the bar is finished in Austin Stone, matching the porch columns and our house.  Also shows the hallway leading to the restroom and storage closet. The square tubing running left to right at the bottom of the trusses will be removed to give it a more open feel. It is non structural at this point and was only used to hold the trusses in place until the roof stringers and panels were put in place. Electrics and plumbing is all roughed in, including separate internet, satellite TV coax / HDMI, and surround sound system to all 4 corners of main room. Roof to be spray foam insulated tomorrow. | |||
|
| One of Us |
Here are a few photos updating construction through 10/15/19. Looks a bit dark right now as there was a storm rolling in and no electricity / lights yet. Electrician comes tomorrow to start hanging lights. Should have lights and Air Conditioning later this week. Enjoy: All of the reclaimed wood is installed. Waiting to install the tin wains coat until after we get the concrete floor stained. Maybe next week.    Got the large glass garage door installed as well. It's 11' tall by 12' wide. You can get an idea of scale by comparing to the standard sized main entry door to the left.  Glass door from outside on the porch.  Will be time to start hanging animals in a couple of weeks!!! | |||
|
| one of us |
Is the ceiling going to remain black? Hell of a man cave. Dave | |||
|
| One of Us |
What kind of "rocket" are you planing to park in there, Todd? (love the wood!). USN (ret) DRSS Verney-Carron 450NE Cogswell & Harrison 375 Fl NE Sabatti Big Five 375 FL Magnum NE DSC Life Member NRA Life Member | |||
|
| One of Us |
NP2, yes, roof remains black. Should be well light with the number of lights going in. Will know more in a few days. The electricians started hanging lights today but the power isn't on just yet. Maybe tomorrow. Jorge ... Dodge Viper! But not through the glass garage door. See the floor plan on page 1. There is another standard sized garage door on the front side where the car comes in. The glass door is to give the place an "inside / outside" feel which can be enhanced by opening the door on nice days. The glass door is shielded by a 15' by 40' porch roof so no direct sunlight enters to destroy the mounts. | |||
|
| One of Us |
Beauty! almost as fast as your Hornet! Can't wait ti see the finished place, WITH the car inside of course! USN (ret) DRSS Verney-Carron 450NE Cogswell & Harrison 375 Fl NE Sabatti Big Five 375 FL Magnum NE DSC Life Member NRA Life Member | |||
|
| One of Us |
That's gonna be a real cool place. Looking forward to see the progress | |||
|
| One of Us |
Lots of good ideas shared, Todd. Can't wait to see it finished, really cool and you've got my wheels turning. | |||
|
| One of Us |
Here are some new photos. Lights and Heat/AC are installed. Still haven't gotten the floor stained. That's the current road block. That needs completing before the tin wanes coat, final plumbing, and setting the bar into place. But it's getting there. Enjoy:    I'm struggling to get the settings on my camera set correctly to show the Edison Bulb lights over the bar area. Looks washed out here but it's a nice effect in person.  | |||
|
| One of Us |
Yeah man, that place is looking great. Wasn’t so sure about the horizontal walls, but they are interesting as hell. Coming along! | |||
|
| One of Us |
Hey Baxter. Yeah, when I first searched for the wood, I was looking for reclaimed barn wood. What I found was predominately reclaimed and disassembled pallets. I asked for a few sample photos and was convinced it would work. I think it has. There is some trim remaining, mainly in the corners but other than that, I'm pleased with it. I'll tell you what I was really concerned about however and that was the trusses. Being a builder, I have a pretty decent ability to visually project how a project will look when finished but when the crews started erecting those trusses, I was having serious doubts. For one, they looked WAY overbuilt and any red iron structure looks hideous to me until it's painted. Once we removed the bottom support that ran parallel to the peak, it opened them up. Now that they are painted and we have the lights installed, as well as the contrast provided by the rigid HVAC ducting (which will now remain silver), I think they work well. I'm at the stage now where I'm REALLY ready to be finished with it, get the yard cleaned up again, and everything back to a normal household. What I'm REALLY ready to do now is start hanging taxidermy. I've mapped out where everything needs to go and one of the nice things about the wood walls is, when it's time to move things around as new mounts arrive, there's no need to patch holes as the old pallet planks have old nail holes everywhere already. Any new holes will just add more character. | |||
|
| One of Us |
Super cool, Todd. I like the looks and the vision. I meant to be DSC Member...bad typing skills. Marcus Cady DRSS | |||
|
| One of Us |
I like it. I'm liking the black painted ceiling. I have floated that idea by the wife when i get around to finishing my basement, so the ceiling will not feel as low. | |||
|
| One of Us |
The late great Duncan Gilchrist had a book on trophy room design. It was printed in the early 1990's, and he talks about using wood as backdrop for animals. Looks like your place will be really nice. | |||
|
| One of Us |
Very interesting thread that I'm looking forward to following and seeing how it turns out. Like the others, I have a goal of one day building my room and I'm always looking for ideas from others on what they did. Thanks for sharing, the pics are very helpful!!! | |||
|
| One of Us |
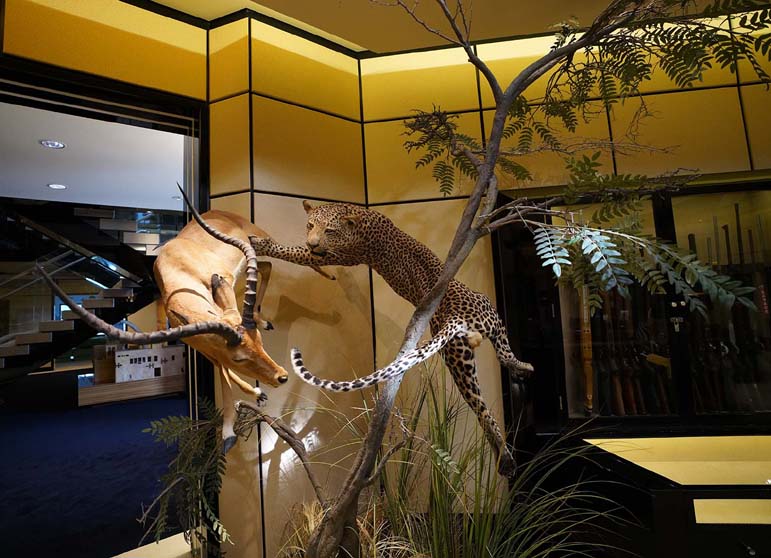
Thanks for the nice comments. Apologies for the slow progress photos. We are literally down to just a couple of remaining contractors to get it finished so that taxidermy can start being hung and moved in. Unlike earlier, when you have multiple contractors going, when you have just a couple remaining and one doesn't show up, NOTHING gets done. So hopefully we will have the final push here in the next couple of weeks and I can provide some completion photos with animals on the walls. | |||
|
| One of Us |
Just a teaser. First animal hung on the wall today. More to follow.  | |||
|
| One of Us |
Get on with it boy! More anxious to see it done than you! Guns and hunting | |||
|
| One of Us |
Nice christening. I meant to be DSC Member...bad typing skills. Marcus Cady DRSS | |||
|
| One of Us |
I wasn't sure I was on board with the tin wainscoat, but I must admit, it looks really good on that wall. Great buck! | |||
|
| One of Us |
OK, Floor and all trim are done. Got the 85" TV in last night. Setting the Bar Monday but for this weekend it's time to hang animals!!  | |||
|
| One of Us |
Very nice! But you need to shoo the neighbors damn dog out of there before he makes a mess! | |||
|
| Powered by Social Strata | Page 1 2 3 4 |
| Please Wait. Your request is being processed... |
Hunting Trophy Room Pictures

Visit our on-line store for AR Memorabilia
