 Hunting Bowhunting
 Go | New | Find | Notify | Tools | Reply |
| Cape Buffalo Arrow for 2012 | Login/Join |
| one of us |
I had all this posted in a different thread that was poorly named for the way the discussion went. So I'm moving the tech info here. Old posts are divided by: ################### The first "external footing" I tried was one inch (100 grains) of stainless .049 wall tubing. Just enough clearance on ID for some epoxy and OD is 3/8", matching the 315 grain ABS Ashby broadheads. Last time I tested arrows on cape buffalo carcases I had several failures of the ferrule/insert/arrow where the arrow meets the BH. That was NOT with the ABS Ashby broadheads, but it's still the weakest spot.) The footing gives the best "gusseting" for the shaft/ferrule interface, and stiffens and protects the end of the arrow shaft. On these Axis ST arrows the Hidden Insert Technology means that there is normally no metal (insert) on the last 0.4" of the shaft. The external footing covers that up nicely. Some testing yesterday seemed to indicate that the spine was at least in the ballpark. I can get decent bareshaft groups at 20 yards, with the bareshafts grouping with the fletched shafts. I can rotate the nock on all the bareshafts 90 degrees at a time, and they still group together. I think that might mean the dynamic spine is both sufficient and consistent around the shafts. ############ For Cape Buff I plan to use the Alaska Bow Supply (ABS) Ashby heads that weigh 315 grains, and are one-piece 440C stainless. I have brass inserts that weigh 100 grains. The 3/8" SS tubing footer adds 100 grains. Add the Asby and it's a 515 grain head. Ed Ashby's latest thing is Extreme Front OF Center (EFOC) arrows. The idea is to use the lightest shaft/fletches/nock that has enough spine for the head. It penetrates a lot better than same-weight arrows with normal/lower FOC. If I can get the FOC above 30% it will be in his Ultra EFOC group, which he says is the ultimate in penetration. The lightweight shaft is also less likely to bend/break at the insert or ferrule when the arrow has to change directions as the head breaks a bone then slides into the crack. I remember seeing the fletches slap when testing the heavy arrow/heavy head 900 grain arrows I took to TZ last time. Had some failures on scapula shots. One was a bent Grizzlie (!), two were bent/broken ferrule/adapters. I was using 125 grain steel adapers that I had case-hardened. No adapters broke, but some bent. A mature Cape Buff has some heavy and hard bones. Even the ribs are very tough and hard and likely to make a BH slide before penetrating. I was getting 220 fps from an 80# x 30" Allegiance last time. That's 96 KE, .87 momentum on an 895 grain arrow. My 73# 101st matched those numbers at 30" draw, but I dropped back to a more useable 29" draw and now get 208 fps/86 KE/0.83 momentum on an 895 grain arrow. Guess I'm getting old. Was considering an 80# Monster for this trip, but decided that it wasn't worth the hassle. (Update: after dry-firing my 101st I am going to order an 80# Monster.) Ashby says (and my experience upholds it) that it's a matter of how much inertia is in the broadhead and how much is in the shaft. Basically weight at the back of the shaft provides the inertia that makes the back of the arrow flop sideways when the head changes direction, stressing the ferrule area. In his testing on water buffalo carcases (almost Cape Buff from a bone standpoint) when he used heavy shafts/heavy arrows with "normal" FOC of about 15% he typically had a 16% failure rate of the shaft/insert/ferrule/adapter. When he made arrows of the same total weight, but put the weight up front (25-30% FOC) he had ZERO shaft/insert/adapter failures at the shaft/insert/ferrule/adapter on the same broadside shots that had previously caused the 16% failure rate. He said in his 2008 report that he'd test angled shots in a future test, but that has not been published yet if it has been done. (Update: Ashby has health problems that effectively prevent any further testing.) 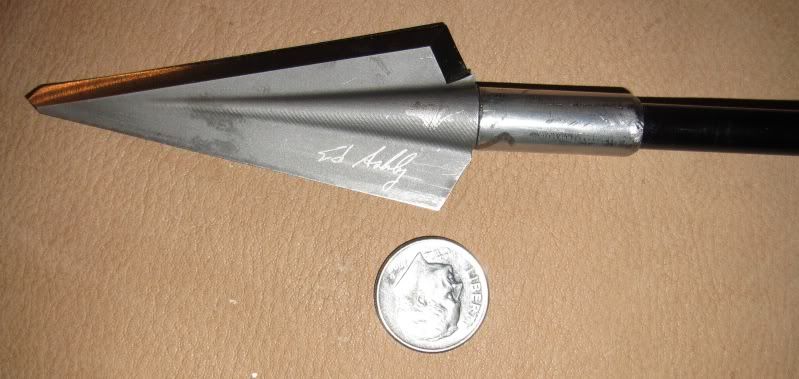 Here's a photo of the Asbhy BH with the 3/8" SS tubing external footer. ################################# 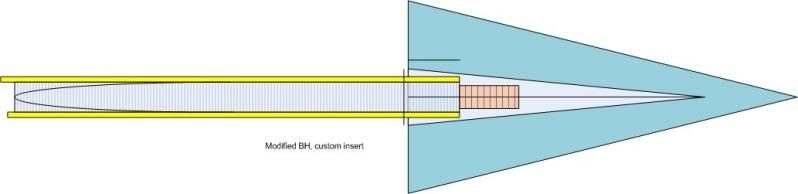 INTERNAL FERRULE DESIGN Here's a sketch of what I think would be the best broadhead/shaft interface design for the skinny Axis ST shafts. No bending motion can ever get applied to the threads, and the bending motion is applied to the shaft only where the insert is full diameter metal. Should be unbreakable if the insert/footer is made of spring steel. The head is a modified Alaska Bowhunter Supply (ABS) 315 gr Ashby. It would require a custom insert as shown, or a piece of all-thread and a standard HIT insert (or the 75 gr Easton brass or 100 gr brass insert from 3Rivers), glued in forward in the shaft. No luck finding a machine shop that would take this on. ################################## I was having trouble even finding a machinist to taper the tubing for me, so I put a section of 2.4"x2016, 1"x 2215, .25"x 2413. The 2413 is a press fit on the 2215, so I'm not sure if enough glue stays in to hold it. I will use 2412 for the next batch. Footing adds 40 grains total. The 28.5" arrow weighs 780 grains total with feather fletch. The FOC is 29.3%, not quite meeting Ashby's definition of Ultra Extreme FOC. 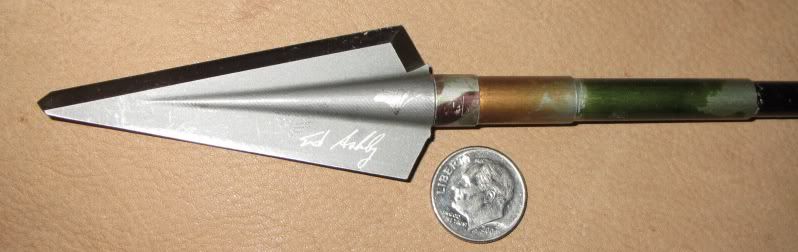 This gives one layer of support .2" past the 3 rivers 100 grain brass insert, 2 layers past the threaded section of the insert and a full 3/8" diameter end section that matches the OD of the Alaska Bowhunting Suppply Ashby broadhead. ### The 3-footed arrows grouped well from my 101st Airborne, both bareshaft and fletched. Then I dry-fired the 101st last night while letting it down after testing some re-serving. DOH! Don_G ...from Texas, by way of Mason, Ohio and Aurora, Colorado! | ||
|
| One of Us |
Don, that looks like it ought to work... I used some 315gr Ashbys deer hunting in Alabama. I found that I had to really rework the edge before sharpening, but once done they got sharp...and stayed sharp. Good head. troy Birmingham, Al | |||
|
| one of us |
You must have had some of the early ones. The three I've bought so far were literally shaving sharp. The tanto tip needs 2-3 strokes, because I want a cut-on-contact tip. They leave that squared off because some feel the factory method is stronger. A 315 gr head on deer! Man, even I call that overkill! Don_G ...from Texas, by way of Mason, Ohio and Aurora, Colorado! | |||
|
| One of Us |
Try some Loctite 640 (sleeve retainer) to hold that 2413 in place. It's actually formulated to work best with a slight press or sliding fit. Put the Loctite on the 2215. Heat the 2413 with a torch and then slide it on the 2215. I wouldn't think it should take much heat at all to make slide right on there. Just as long as the 640 isn't heated above 400F it will cure to full strength. This stuff works best when assembled with a heat shrink (it gets into the pores of the heated metal better). Cure time on this stuff is 24hrs so wait until the next day to test one. Another thought is this. You could bump your FOC up slightly by gluing the fletchings another 1/2" forward of the nock end. (Assuming you are now gluing them 1" from that end they will now be 1 1/2") Hopefully, you won't get a stress riser effect at the ends of each tubing section on the footing. Chamfering the ends of each tubing section may help if this surfaces as an issue. | |||
|
| one of us |
Thanks for the tips. I guess I could try to use the heat/loctite on the 2413 before the 2215 is put on the arrow/2016. Don't want to heat the carbon shaft. I've got a bit of inside chamfer on the sleeves, but will put more - you may be right about stress risers, but I think carbon is more forgiving in that respect (fatigue). The chamfer would help prevent simple stress concentration too. (The other two edges still have the solid brass insert behind them. Hard to believe that will flex enough over a lifetime to allow stress risers in the aluminum sleeves there.) The feathers are 2" shield cut, all three weigh only 3.6 grains. They are so small I think I'll leave 'em right aft for "rudder authority." You certainly are in the right vein with your suggestions. Thanks! Don_G ...from Texas, by way of Mason, Ohio and Aurora, Colorado! | |||
|
| One of Us |
You're welcome. You do get more stabilization in flight from fletchings with higher FOC. But with small 2" feathers I agree you'll probably need to keep them back there. | |||
|
| one of us |
So, BG, you got any practical suggestions for a "worst case" but realistic buffalo carcase simulator? I don't think slamming the arrow squarely into a steel or rock wall is a worst case test. (They survive.) Shooting into a wall at an angle is unfair as the back of the arrow hits the wall or the edge of the steel plate and breaks in an unrealistic situation. Don_G ...from Texas, by way of Mason, Ohio and Aurora, Colorado! | |||
|
| One of Us |
Don, the ones I have were from the very first batch available. Once reworked they are great heads... the head is very heavy out of a 57# longbow, drop pretty bad past twenty yards!!!! troy Birmingham, Al | |||
|
| one of us |
Dtala, I'll bet they do - but I bet they go through anything you hit! I just ordered 18 of 'em. Left-hand this time. Wanted them to tighten when they hit flesh. Got the left fletch to go with 'em. BG- I checked on the 640. It only has 50% strength on aluminum. (Wants iron or other "active" metal.) I guess I'll stick with the messier HIT epoxy. Don_G ...from Texas, by way of Mason, Ohio and Aurora, Colorado! | |||
|
| One of Us |
Aluminum is tough to stick with any adhesive. How much strength do you think you're getting with the HIT epoxy? It might not be doing better. I agree the steel or rock wall wouldn't yield any meaningful results. Buffalo carcass simulator is a tough one. 3/4" to 1" thick plywood might be a better substitute for rock or steel. It won't destroy the arrows. But after a couple shots into it you may discover some weak points you wish to address. | |||
|
| one of us |
I really can't tell on the HIT epoxy either, but at least it does not say it cures to 1/2 strength. The stress I want to mimic is that which happens when the head slides sideways then bites. I've shot stone walls and steel plates at angles, and gotten some breakage, but I think it's bogus. I think I'll get a chunk of angle iron and coat it with rubber somehow, then shoot the arrows so that they slide to the bottom of the vee. When they hit the bottom the shaft should be mis-aligned with the line-of-flight, causing max imum stress on the ferrule. Don't know how realistic it is, but it should be interesting! Building on your idea, maybe bolting the angle iron vee-out to a plywood/particle board slab would have it slide, then bite into a tough medium that would force a change in direction. That sounds a bit more realistic. Don_G ...from Texas, by way of Mason, Ohio and Aurora, Colorado! | |||
|
| One of Us |
How about securing a piece of thick carpeting to the plywood. Secure it fiber side against the board and backing facing the shooter. Heck you could even use a couple layers of carpet to simulate thick skin. I think you are definitely on the right track creating an angle shot where the head slides some before snagging. The multilayer plywood (7-10 layer) used for cabinet building would simulate tough bone much better than standard 3-5 layer stuff. It would also be much tougher than OSB or Particle board. | |||
|
| One of Us |
How about sealing the outside of your footing with this stuff? http://www.devcon.com/prodfiles/pdfs/fam_tds_103.pdf | |||
|
| one of us |
I'm fixing to have a bunch of old carpeting. Very timely suggestion. I like it. Only downside is that for the initial (cheaper) testing I wanted to use field points. (Cheap is relative, they are $1.50 each!) The carpet will tend to capture the shaft in the weave instead of having a slice to move in. I want to minimize testing with the $40 broadheads! Don_G ...from Texas, by way of Mason, Ohio and Aurora, Colorado! | |||
|
| one of us |
Testing report 10/23/2012 I tested some arrows to destruction yesterday. I put some rubber tubing on the edges of a 36" section of 2x2 angle iron. The idea was the tubing might help protect the shafts from the edges of the angle iron after the arrow deflected to the side. The tubing did not help much, as you will see. Background: I am pretty well convinced that many reinforced shafts can survive a square direct hit on a hard surface. The problems come when the arrow deflects on heavy bone, or splits the bone and is forced to change direction to follow the split. Anybody that's hunted a lot has seen the fletches slap around when an arrow deflects in an animal. Heavy arrow shafts exacerbate the problem. High FOC arrows reduce the problem to an extent, and external footings can help support the shaft/insert. The remaining weak spot is the ferrule/shaft/insert junction. If the ferrule bends, penetration in an animal effectively stops, hence ferrule integrity is crucial to the successful hunting of heavy game. The skidding hit on the angle iron causing an off-angle hit of the target is a very tough test of the arrow's integrity. (It is arguably too tough.) 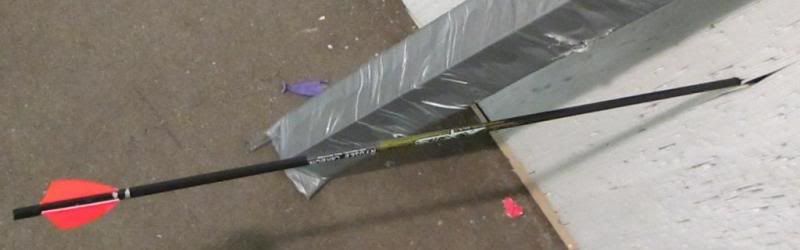 All arrows lost or broke the nock as they hit. At least two broke off leaving a piece inside the shaft. This indicates that we need both tougher and lighter nocks. Weight at the back of the arrow is a Very Bad Thing! First Arrow: 830 grain total weight, 28.5" Axis ST 300 shaft, 2.5" Right helical feather fletch: 3@120 degrees, 100 grain 3Rivers brass insert, 100 grain external footing: 1" of 3/8" SS .49 wall tubing, 315 grain ABS field tip. This arrow struck about 3/4 inch from the edge of the iron and skidded to the edge, staying in contact with the iron. The arrow stayed right next to the iron and entered the target. The external footing was slightly deformed at the front face, the field point was deformed at the tip, the body was bent, and the ferrule was bent. The external footing only covered the first 1" of shaft and brass insert. The shaft was cracked at the rear of the footing and the brass insert was bent. The shaft was also damaged 6" back where the side of the shaft hit the edge of the iron. 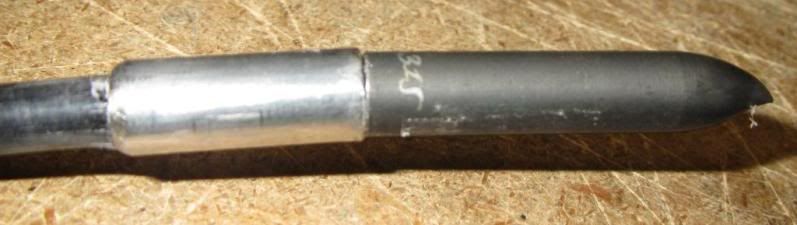 Second arrow: 780 grain total weight, 28.5" Axis ST 300 shaft, 2" Left Helical feather fletch: 3@120 degrees, 100 grain 3Rivers brass insert, 40 grain external footing: 2.4"x2016, 1"x 2215, .25"x 2413, 315 grain ABS field tip. This arrow struck the iron about one inch from the edge and skidded to the edge while staying in contact. The external footing was scraped on the side by the iron but otherwise intact, the field point was deformed at the tip, bent in the body and bent at the ferrule. The shaft broke in half where it slammed sideways into the edge of the iron. 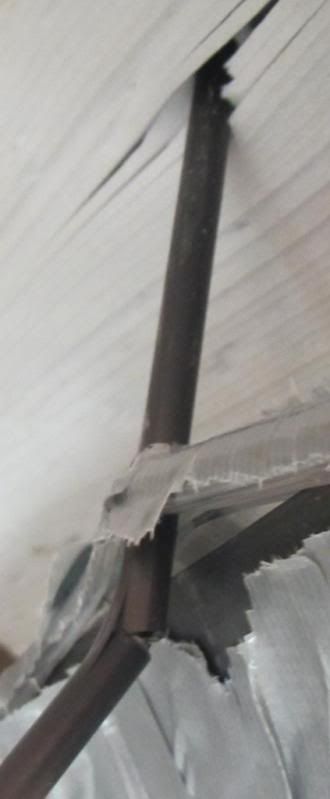 first shot top arrow, second shot middle, third shot bottom 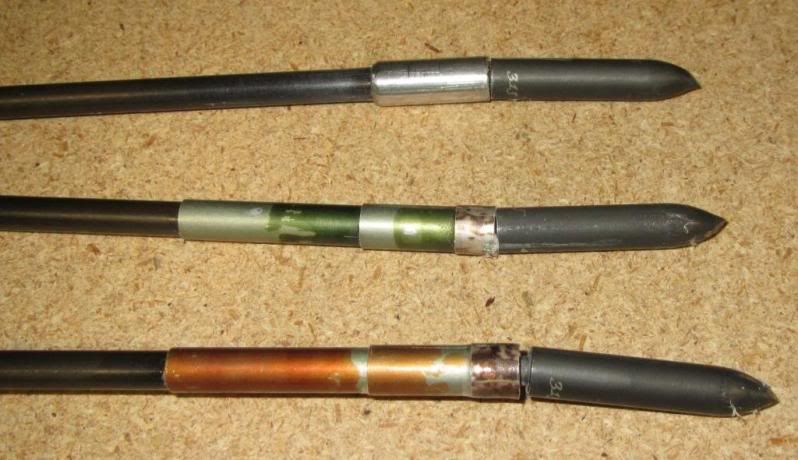 Third arrow: 780 grain total weight, 28.5" Axis ST 300 shaft, 2" Left Helical feather fletch: 3@120 degrees, 100 grain 3Rivers brass insert, 40 grain external footing: 2.4"x2016, 1"x 2215, .25"x 2413, 315 grain ABS field tip. This arrow hit almost at the center of the iron, then bounced away far enough for the shaft to clear the iron. The tip did stay in contact with the iron from initial impact to the edge of the iron. The external footing was intact, the field point was deformed at the tip, bent in the body, and bent at the ferrule. At first it appeared that the insert had shifted forward, but that was not the case: apparently the BH had unscrewed when the bent/off center BH hit the target and the shaft kept spinning. The shaft was intact and straight. Perfectly shootable. I'm not sure what I learned on this test, other than the three-layered footing is superior to the single thick footing. This stands to reason, as the extended, effectively tapered footing extends .3" past the brass insert, and has a full-contact interface with the ferrule. As a matter of fact the footing is 3/8 OD to match the Ashby broadhead, and is bigger than the field tip diameter. Next test I will put a "footing" on the back of the practice tip to see if the extra .025 contact patch helps the ferrule survive. I kinda doubt it, but I have gone this far... The 315 gr field point is a fairly good model of the Ashby BH, since it extends 1.75" from the ferrule, but it is not worst case. The Ashby BH extends 2.67" from the face of the ferrule, giving it even more leverage to bend/break the ferrule. It is fairly discouraging that the BODY of the field tip bent all three times. (Just enough to show up when rolled on a table - not visibly bent.) Admittedly this is mild steel, but it is solid and 0.345" diameter. We obviously need a better design somehow. After these tests I'm not sure even the "internal ferrule" BH would enable the arrow to maintain complete integrity. I suspect that with a spring-steel insert the arrow would stay straight and penetrate well, but the shaft would probably be damaged where it exited the BH. The crucial thing is the penetration, though. Please speak up with ideas and discussion. My problems are not unique, and we might learn lessons applicable industry-wide by studying this admittedly extreme case. {edit to add] I later found that the glue had failed on the insert of the third arrow. When trying to tighten another head with a wrench it began to spin at full torque. Thanks, Don_G ...from Texas, by way of Mason, Ohio and Aurora, Colorado! | |||
|
| One of Us |
these tests fascinate me. so Don, have you taken cape buff before? or is this all planning for a first time future hunt? | |||
|
| one of us |
I took two cape buff with a rifle in 2006.(?? my memory is questionable as to dates!) Had three buff on license, and carried the bow the whole time with tracker carrying the rifle. Never got a shot opportunity with the bow, but had a great time sneaking into herds, etc. Tested 24 bow shots or so into the carcases. Maybe Canuck can help fill in the details missing from my memory. (He used to have some video of the shots.) But I know that most arrow failures were at the ferrule/shaft interface from my incomplete notes. Hope to go back this coming year with a setup that can't fail at the ferrule. Don_G ...from Texas, by way of Mason, Ohio and Aurora, Colorado! | |||
|
| One of Us |
I love this stuff as well! I have been reading with great interest. I am actually an Alaska Bowhunting Supply dealer so if you guys ever need anything let me know. Have you done any testing with the Nanook head? I took a giraffe this year with a nannok 315, grizzlystik safari shaft and 4 rw helical feather fletching. Tom Addleman tom@dirtnapgear.com | |||
|
| One of Us |
Don, It's obvious the problem area is right where the head touches the face of the insert. Perhaps you need to consider epoxying the head in and to the footing. A small lockwasher might help (big might). This is interesting I should have guessed that would be a problem area. | |||
|
| One of Us |
I agree, try glueing the head into the insert. I'd use slow cure epoxy and let it sit for a couple of days to reach full cure. | |||
|
| one of us |
I will try epoxying one in with the strongest stuff I have (2-Ton slow cure epoxy.) But I'm willing to bet it will not help. When the substrate is deformed the epoxy fails immediately. Also, the failure will be caused by a "peeling motion" as the tip bends sideways off the ferrule/footer. The glue is weakest in this aspect. I'll let the glue cure a full 48 hours or more to guarantee full strength. I think an internal ferrule design like the sketch above is required, along with a spring-steel insert and internal footer. Don_G ...from Texas, by way of Mason, Ohio and Aurora, Colorado! | |||
|
| one of us |
I will order from you in future. I just got $700 (18) worth of the Ashby 315s delivered. They sent them Priority Mail with no signature required, and of course they went missing for a week. Since the Post Office had checked the "Delivery Confirmed" box, it would have been my loss. The ABS website should explain that they do not require a signature, and that packages delivered to the wrong address by the Post Office will be the (non-)recipient's responsibility. Sheesh! Ginny at customer service should never be allowed to actually talk to a customer. This is after two transactions with her on the phone. 'nuff said. (If she is your Significant Other or mother, my condolences.) I have not tested the Nanook, since I'm an Ashby follower. (Drank the Koolaid in 2004.) I am beginning to see integrity advantages in the shorter heads, but not penetration. Don_G ...from Texas, by way of Mason, Ohio and Aurora, Colorado! | |||
|
| One of Us |
Thinking about this I feel confident you are right that epoxy alone will not solve the issue. I suggest you apply just one layer of fiberglass cloth tape over the joint while the epoxy is still wet. Then wet the tape completely with more epoxy. (Cover the joint with wax paper and roll it firmly on something hard. The wax paper will peel right off after cure unless some wrinkles get trapped. So take care to avoid wrinkles in the paper.) The result will be magnitudes stronger than epoxy alone. I've fixed showers, Lawn furniture and dings on boats with this method. The results are very strong. You can get pieces of this fiberglass cloth tape or small pieces of cloth mat at boating stores. | |||
|
| one of us |
If the fibergalss is on the outside (only place it could be?), then I think it would kill penetration pretty quickly. Maybe I'm not picturing it right? Don_G ...from Texas, by way of Mason, Ohio and Aurora, Colorado! | |||
|
| One of Us |
Wonder is a "shock absorber" would mitigate the damage? Looks like something is needed to continue to transfer/dissipate the shock further down the arrow. Carbon rod on the inside under the ferrule? Or some sort of silicone damper gel? I know silicone is used to dampen vibrations in a lot of electronic products (and in some bow stabilizers). Loctite 18718 might work. Not exactly a shock damper, but it does have those properties. SCI Life Member DSC Life Member | |||
|
| one of us |
I think the only practical answer is a spring-steel ferrule/insert Like this: INTERNAL FERRULE DESIGN Here's a sketch of what I think would be the best broadhead/shaft interface design for the skinny Axis ST shafts. No bending motion can ever get applied to the threads, and the bending motion is applied to the shaft only where the insert is full diameter metal. Should be unbreakable if the insert/footer is made of spring steel. The head is a modified Alaska Bowhunter Supply (ABS) 315 gr Ashby. It would require a custom insert as shown, or a piece of all-thread and a standard HIT insert (or the 75 gr Easton brass or 100 gr brass insert from 3Rivers), glued in forward in the shaft. No luck finding a machine shop that would take this on. Don_G ...from Texas, by way of Mason, Ohio and Aurora, Colorado! | |||
|
| One of Us |
I don't think the epoxy adds strength as much as it simply stops movement between the components. Even between the thread of the head and insert there is a bit of movement. As for your insert, how about a machining student? It's not a hard thing to make and you could even make it yourself if you had access to a lathe. I talked a lot with O.L. Adcock about that idea, him and Ashby came up with it but they were using oak dowelling to experiment with. The important part is getting the curve on the insert to be the correct radius. As you can imagine it gets its strength from transferring the lateral forces in a "gentle and countinous" motion to the insides of the shaft and not concentrating the force in any one area before it moves along. | |||
|
| one of us |
No sense making the inserts unless I have the modified broadheads to use them with. I have also heard that various arrow manufacturers have extensively experimented with various curves on their inserts and internal footers, and have found no improvement in survivability for carbon shafts. I heard this from a credible source, but have no way to assess how good his source was. Still, I'd put the curved section on if I get the chance. Don_G ...from Texas, by way of Mason, Ohio and Aurora, Colorado! | |||
|
| one of us |
try easton fmj arrows carbon arrows wraped i metal.... 17= grains per inch with 10 grain per inch inserts 1100 i use a hoyt hypertec still at 92#@27" with a 1100 grain set up my broad heas are the steel force primium 2 blad 225 grain heads this same set up has been used to shoot right thru bull elephants... give the fmj arrows a try you wont be disapointed. | |||
|
| one of us |
Thanks for the suggestion, but I'm wanting to use an extreme FOC arrow. I will choose between the Easton 300 or the Gold Tip 200 shaft with external footers. The shaft is not the problem - it's the head/insert. After buying 21 of the Ashby broadheads at almost $40 each delivered, I got a PM from an Aussie hunter saying that every Ashby broadhead he'd recovered (5 of 6) shot at water buff had failed. All failures were on hitting a rib on entry. 4 of the failures were breakage 1/3 back from the tip, the other broke at the ferrule. This type of failure is usually due to over-hardening or poor metallurgy. Still no pics or further details, but I've run into an industry source who had exactly the same info from the hunter's PH. Right now, without names and details I have to say this is still an unconfirmed rumor, but I believe it is true. Don_G ...from Texas, by way of Mason, Ohio and Aurora, Colorado! | |||
|
| one of us |
i have never experienced a insert failure on contact with heavy bone with my set up and iv even gone thru the trouble of shooting a few fmj arrows with the steel force primium heads 225 grn and they if extracted carfuly could be used again with out any damage to the setup. there smaller dia co-oped with the steel wrap make them extreamly durable. im currently in the process of building up to 120# long bow for a cow elephant hunt right now im using a 100# tomahawk ss diamond seris bow and i may just settle on this bow as the performace is astounding...using same 225 grain steel force im currently looking at a few 300 grain options. | |||
|
| one of us |
The "wrap" on he FMJs is aluminum, just like I'm putting on the first few inches of my arrows. They are not as strong in the front 2.25" as the arrows I'm building up. They are good arrows, just not what I want. If you have never suffered an insert/ferrule failure then you have been very lucky. I have used the SteelForce heads in the past. They will bend at the ferrule just like every other head I have tried. They don't bend every time, and I have re-used them after passing through a deer ad sticking in a tree. I also had one bend on the scapula of a two-year old buck back in Ohio. (The buck was killed during the "failure.") You must be a Hell of a man - I'm doing good to draw an 80# bow at 60 years of age. But that 80# compound generates enough KE and momentum that I cannot find an arrow/insert/broadhead combo that won't fail at the insert/ferrule given the "wrong" circumstances. Don_G ...from Texas, by way of Mason, Ohio and Aurora, Colorado! | |||
|
| one of us |
your doing good for your age keep it up i turn 30 this march but im aslo heavy into body building wich helps alot in the bow # department. | |||
|
| one of us |
Well, the new strings and cams seem to have fixed the 101st after I dry-fired it. Then I had to wait for my elbow to heal, but I tested an Ashby 315 gr Right Bevel broadhead today. The broadhead was glued and screwed into the arrow, and tightened with a wrench. The arrow was one of the triple-footed Axis ST 300s as described above. Ashby BH is pic below. 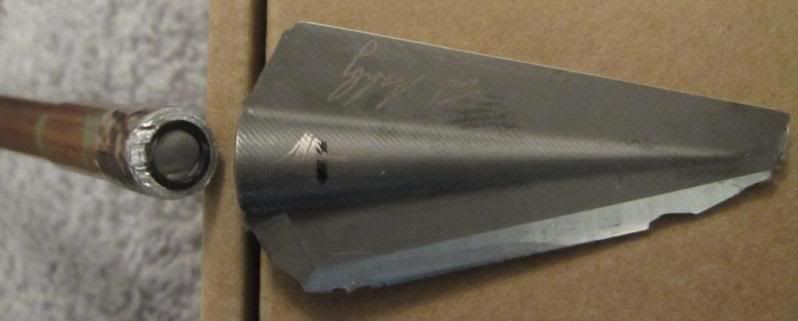 When it hit the angle iron the tip buried into the angle iron about .1 inches or so, then apparently the tip and the ferrule broke at about the same time. The aluminum footer smeared onto the iron within .2" of the tip strike, indicating that the ferrule broke early in the event. There is a bump on the back of the iron where the tip struck, so it had some power. The broadhead struck the iron again about 1/2" downslope from the tip strike. I think this is when the lower corner broke off, meaning the BH had flipped almost 180 degrees. The tip and the corner are stuck in the iron, but I cannot get a reasonable pic of it to come out. The BH then ricocheted back across the floor, breaking the other rear corner and taking several chips off the edge. This appears to me as if it is breaking like glass or flint, the fracture at the tip travelled back along the edge exactly like glass. Photo below added 1/8/2012 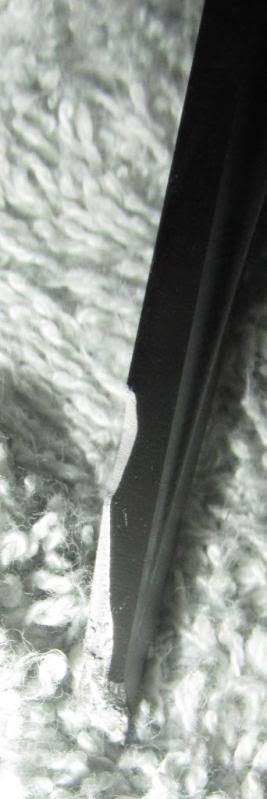 Photo below added 1/8/2012 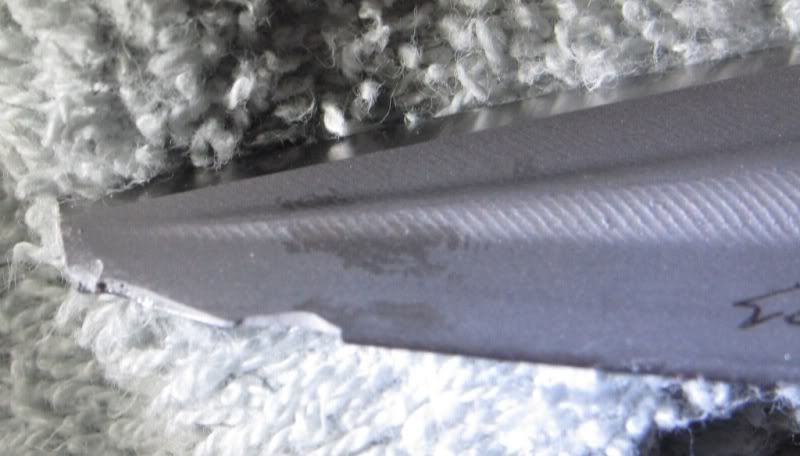 I also shot a glued-in practice tip at the angle iron. It is shown below. It bent at the tip, and at the ferrule. Since I cannot get it off the arrow I cannot tell if the body is bent, but I suspect it is slightly bent like all the others (not that it matters.) Note that I had glued an aluminum "footer" on the practice tip (black section in photo) so that it was the same diamter as the arrow footer. This should have given a bit more support to the ferrule - but not much. I do think that gluing in the BH is the right thing to do on a Cape Buff arrow. I might not do it on my elk arrows. 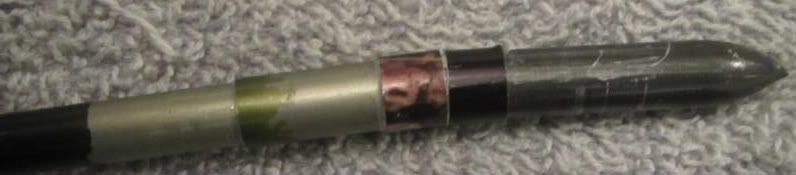 I'm going to try a bit gentler test next on the Ashby BH, shooting it glued into an unfletched footed shaft into a piece of plywood or particle board. I think the uncoordinated flight of the shaft will give the ferrule a reasonable test, about like if the tip skidded a little out of the line-of-flight on a rib. Stay tuned. Don_G ...from Texas, by way of Mason, Ohio and Aurora, Colorado! | |||
|
| One of Us |
I love the way that you torture test your arrows Don. Fritz Rabe Askari Adventures & Fritz Rabe Bow-hunting | |||
|
| one of us |
It gets expensive, but I'd rather waste a few hundred bucks than wind up with a wounded buffalo. Don_G ...from Texas, by way of Mason, Ohio and Aurora, Colorado! | |||
|
| One of Us |
If only more hunters would have your approach there would be less stress for me. Fritz Rabe Askari Adventures & Fritz Rabe Bow-hunting | |||
|
| One of Us |
hey don, have you seen these new heads from nap http://www.newarchery.com/prod...p-six-big-nasty.html granted, they are too light to work for cape buff. but its an interesting design, and i wonder if moving the arrow shaft up into the head design as they did here if it would help to stiffen the end of your arrow up a little. | |||
|
| one of us |
That is exactly the concept I tried to sketch above. That will be one heck of a lot stronger at the ferrule than a regular BH. Don_G ...from Texas, by way of Mason, Ohio and Aurora, Colorado! | |||
|
| one of us |
More testing: Took a piece of OSB to the range and tested the ABS Ashby, the Abowyer Brown Bear and the 300 grain VPA Penetrator against it. (Like a dummy I forgot to take my German-Kinetics.) All BHs were tested with the same arrow, the 455 grain triple-footed Axis ST 300 described above. They were fired from a 73# 101st Airborne at a range of 20 yards. 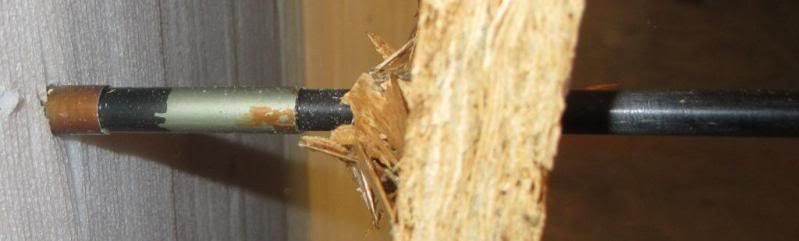 Above is a pic of the single-bevel Ashby BH results. Full penetration, with and impressive hole blasted through. 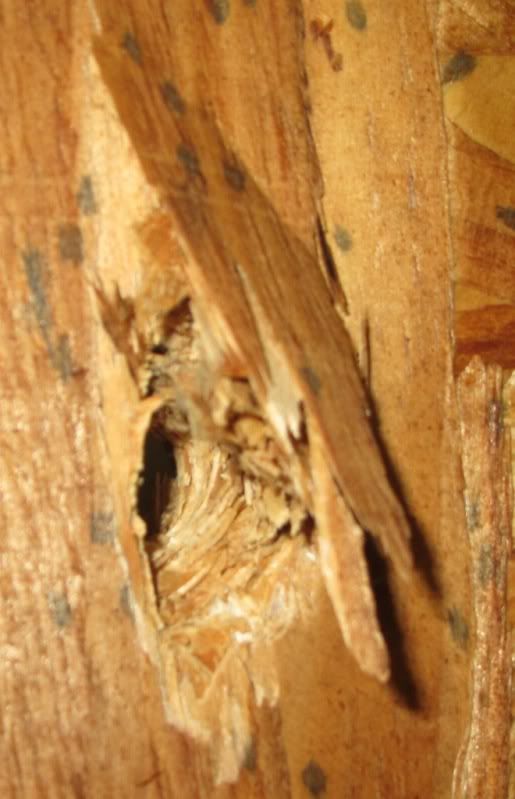 Approximately .05" of the tip broke off the Ashby. Note again that this was at 20 yards with perfectly coordinated arrow flight. This tip should have survived, IMHO. Note also that again the tip is chipped like glass (see detail photo in post above), not torn as would happen with good, tough metal. Ido not like the metallurgy of this BH.  The single bevel Abowyer Brown Bear had similar penetration results, but the tip survived with just a slight burr. Just a few strokes with a stone would restore a perfect edge. 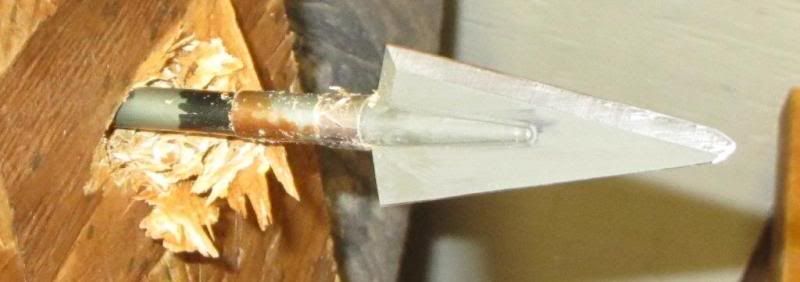 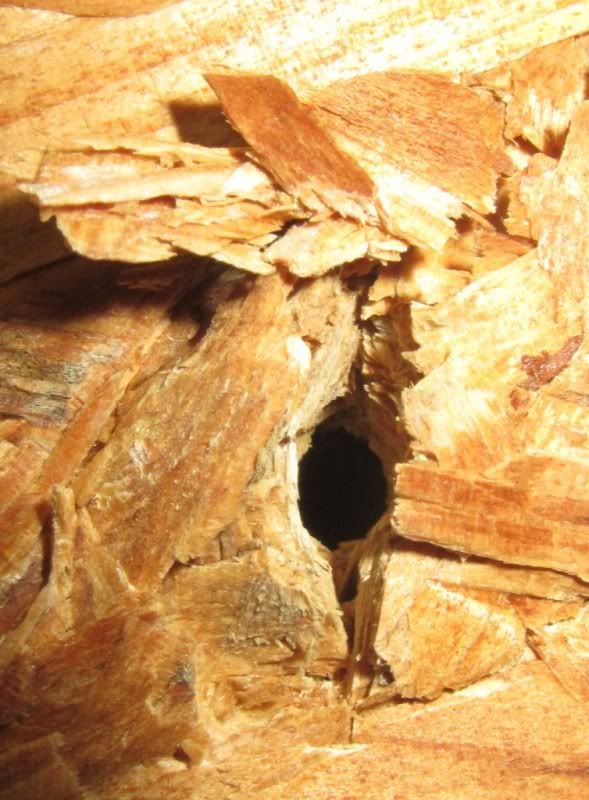 The double-bevel VPA Penetrator did not penetrate as well as the two single-bevel heads, but the BH appears perfectly straight, and the tip is factory perfect. 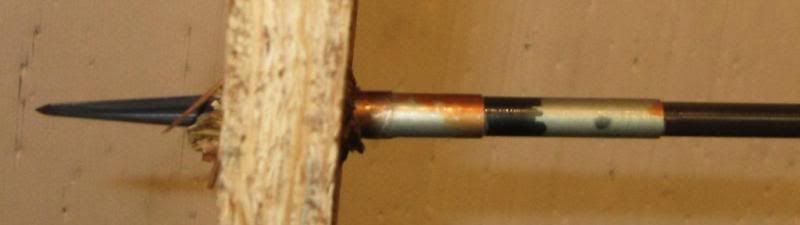 The above photo makes it seem like the Penetrator was stopped by the shaft, but close examination showed that the arrow never made it to the surface of the board. 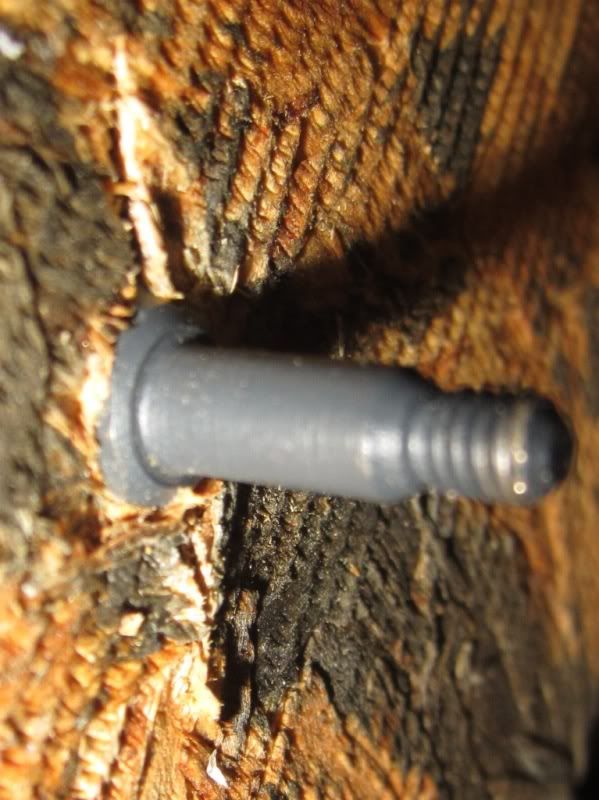 I have to say, though, that of the three BHs, the metallurgy and dimensional control seems best on the VPA Penetrator. The three I got all spin true out of the box. The spine or cone that forms the ferrule on this BH starts right up at the tip of the BH, giving it maximum stiffness and resistance to bending. It will take a bit of work to get the VPA Penetrator out of the wood to see if it still spins true. Overall the results seem to indicate once again that single-bevel BHs tend to out-penetrate double bevel heads in non-homogenous media. I make no claim that this is test mimics an animal carcase, but it is more indicative of penetration in bone than a foam target. Don_G ...from Texas, by way of Mason, Ohio and Aurora, Colorado! | |||
|
| Powered by Social Strata | Page 1 2 3 |
| Please Wait. Your request is being processed... |
Hunting Bowhunting

Visit our on-line store for AR Memorabilia